If you’re an online marketer or website owner, tracking user interactions and gathering data is crucial to understanding your audience and optimizing your digital marketing efforts. Facebook Pixel is a valuable tool that allows you to track user behavior on your website and measure the effectiveness of your Facebook advertising campaigns. Integrating Facebook Pixel with Google Tag Manager simplifies the process of managing and deploying tracking codes on your website. In this article, we’ll guide you through the steps to add Facebook Pixel to Google Tag Manager.
Why Use Google Tag Manager?
Google Tag Manager (GTM) is a free tool offered by Google that simplifies the process of managing various tracking codes, including Facebook Pixel, on your website. It eliminates the need to manually edit website code and allows you to deploy and update tracking scripts without relying on a developer. Here are a few reasons to use GTM:
- Ease of Use: GTM provides a user-friendly interface that allows you to add, edit, and publish tags without extensive technical knowledge.
- Centralized Control: You can manage all your tracking codes from a single platform, making it easier to maintain and update tags.
- Version Control: GTM keeps a history of changes, allowing you to roll back to previous configurations if needed.
- Testing and Debugging: You can preview and test your tags before publishing them to ensure they work correctly.
Now, let’s get started with adding Facebook Pixel to Google Tag Manager.
Prerequisites
Before you begin, ensure you have the following:
- Facebook Business Manager: You must have access to a Facebook Business Manager account and the associated Facebook Ad account where your Facebook Pixel is set up.
- Google Tag Manager Account: Sign up for a Google Tag Manager account if you haven’t already.
- Access to Your Website: You need access to your website to add the GTM container code.
Step To Integrate Facebook Pixel with GTM Manually
The official Facebook documentation suggests employing a Custom HTML tag for integrating the Facebook pixel with Google Tag Manager. Here’s how to do it manually:
-
- Access your Google Tag Manager workspace by visiting tagmanager.google.com and logging in.
- In the left-hand menu, click on “Tags,” then select “New.”
- Give your tag a descriptive name, such as “FB – Pixel.”
- In the “Tag Configuration” section, opt for the “Custom HTML” tag type.
- Paste your Facebook pixel code into the “HTML” box. You can locate your pixel code in the Facebook Event Manager.
- Ensure you are within the correct Ad Account, and select the appropriate pixel or create a new one.
- Choose “Install code manually.”
- Copy the entire pixel code, including both the script, non-script elements, and comments, and then paste it into the Custom HTML tag within Google Tag Manager.
- Under “Triggering,” select the “All Pages” trigger to fire the pixel on all pages of your website.
- Finally, click the blue “Save” button located in the top-right corner to save your changes.

Here is an example of how your complete pixel code should appear. Please remember to replace both occurrences of “XXXXXXXXXXXXXXXX” with your actual pixel ID.
<script>
!function(f,b,e,v,n,t,s)
{if(f.fbq)return;n=f.fbq=function(){n.callMethod?
n.callMethod.apply(n,arguments):n.queue.push(arguments)};
if(!f._fbq)f._fbq=n;n.push=n;n.loaded=!0;n.version=’2.0′;
n.queue=[];t=b.createElement(e);t.async=!0;
t.src=v;s=b.getElementsByTagName(e)[0];
s.parentNode.insertBefore(t,s)}(window, document,’script’,
‘https://connect.facebook.net/en_US/fbevents.js’);
fbq(‘init’, ‘XXXXXXXXXXXXXXXX’); // Replace ‘XXXXXXXXXXXXXXXX’ with your pixel ID
fbq(‘track’, ‘PageView’);
</script>
<noscript><img height=”1″ width=”1″ style=”display:none”
src=”https://www.facebook.com/tr?id=XXXXXXXXXXXXXXXX&ev=PageView&noscript=1″/> <!– Replace ‘XXXXXXXXXXXXXXXX’ with your pixel ID –>
</noscript>
<!– End Facebook Pixel Code –>
After you hit Save, your Facebook pixel has now been added to Google Tag Manager.
Steps to Add Facebook Pixel to Google Tag Manager With Template
1. Set Up a Facebook Pixel
If you haven’t already, create and configure a Facebook Pixel through your Facebook Business Manager account. You can follow Facebook’s official instructions to set up your Pixel.
2. Create a Tag in Google Tag Manager
- Log in to your Google Tag Manager account.
- Click Tags on the left hand side, then click New
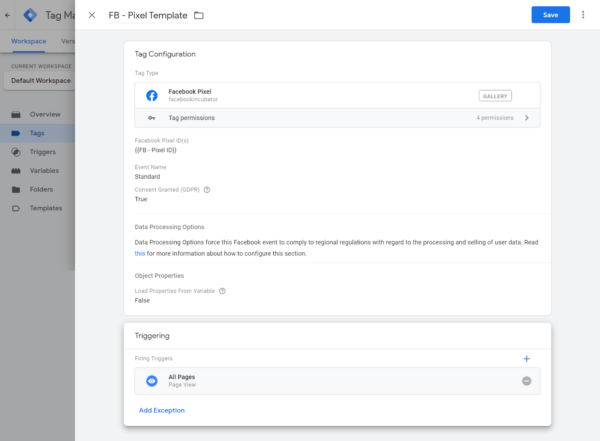
- Give your tag a name, like “FB – Pixel Template”
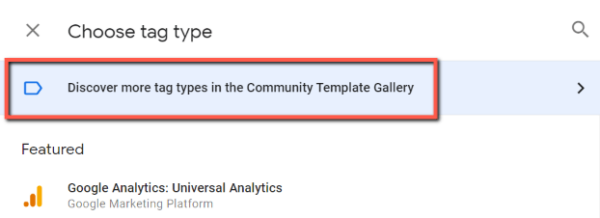
- Click the pencil under Tag Configuration and choose “Discover more tag types in the Community Template Gallery”
- Next, search “Facebook” in GTM and select the “Facebook Pixel” by facebookarchive (or visit this link and click “Add to workspace”)
- Click the “Add to workspace” button in blue, and then proceed to click “Add” to grant the necessary permissions.
- Input your Facebook pixel ID (or use the “FB – Pixel ID” Constant Variable established in the earlier steps).
- This template also enables you to activate other Standard Events, but for now, ensure that the “Standard” radio button is chosen, and “PageView” is selected from the dropdown below.
- Review the remaining settings to ensure they align with your specific requirements. If you only require the fundamental Facebook pixel setup, you might not need to make any adjustments.
- Under the “Triggering” section, opt for the “All Pages” trigger.
- Finally, click the blue “Save” button located in the top-right corner to save your settings.
3. Publish Your Tag
- Once your tag is configured, click on “Save” to save the tag configuration.
- Click “Submit” to publish the changes in your GTM container.
4. Verify Your Setup
Before finalizing your setup, use GTM’s preview mode to test the implementation on your website. Ensure that the Facebook Pixel is firing correctly on the desired pages and tracking the events you intend to measure.
5. Publish Your Container
Once you’ve verified that your tag is working as expected, publish your container in Google Tag Manager to make the changes live on your website.
Congratulations! You have successfully added Facebook Pixel to your website using Google Tag Manager. Now you can start tracking user interactions, optimizing your Facebook advertising campaigns, and gaining valuable insights into your website’s performance.
Remember to regularly check your Facebook Pixel and Google Tag Manager configurations to ensure that they continue to meet your tracking and measurement needs as your website evolves.
Resources
- Using Facebook Pixel with Google Tag Manager – Facebook Help Center
- Create and Install a Facebook Pixel – Facebook Help Center
- Specifications for Facebook Pixel Standard Events – Facebook Help Center
- Implementation – Facebook Pixel – Facebook Developers Center
- Best Practices for Facebook Pixel Setup – Facebook Help Center